Ground Handling
Unexpected wing movement can pull the pilot over, drag them across uneven ground or bring the head into contact with rocks, vehicles or other equipment.
Paragliding Gear Guide
A helmet cannot remove the risk of head injury, but a suitable, correctly fitted and well-maintained helmet can reduce the severity of an impact.
Paragliding helmets are now light, comfortable and available in open-face, full-face and communications-ready designs. The important decisions are certification, fit, retention, coverage, visibility, hearing, ventilation and whether the helmet suits the flying you actually do.

Wear it before the wing comes out
Pilots are particularly exposed during launch preparation, inflation, take-off and landing. A gust, failed launch or dragging incident can create a head impact before the pilot is airborne.
Put the helmet on and fasten it before ground handling. A helmet resting on the ground, hanging from the harness or worn with an open chin strap provides no meaningful protection.
Protection through every stage of the flight
A helmet is not only for a major airborne accident. Many impacts occur close to the ground during ordinary launch, landing and handling errors.
Unexpected wing movement can pull the pilot over, drag them across uneven ground or bring the head into contact with rocks, vehicles or other equipment.
Failed inflations, trips, early seating, rotor, gusts and poor directional control can produce fast impacts while the pilot is still close to terrain.
Mid-air contact, canopy incidents, tree landings or collision with terrain can expose the pilot to direct and rotational head forces.
Misjudged approaches, slope, speed, obstacles and loss of footing can create a backward, sideways or facial impact.
Site assessment, suitable conditions, competent launch technique, active control, a proper landing approach and avoiding unnecessary exposure remain the primary defences.
Look beyond the CE symbol alone
The certification label identifies the standard against which the helmet was assessed. Different sports standards test different impact areas, retention systems and performance.
Airsports-specific standard
EN 966 is the European standard specifically intended for helmets used in airborne sports. For a straightforward paragliding purchase, an EN 966 helmet is the clearest purpose-specific starting point.
Rules may accept alternatives
Some flying organisations and competition rules accept certain snow-sports helmet standards in addition to EN 966. Acceptance depends on the organisation, event, national system and current rule wording.
Marking is not the whole answer
A CE mark by itself does not tell you which helmet standard applies. Look for the full certification, model, size, manufacturer, production information and user instructions.
Check the current rules
BHPA members should consult the current BHPA Rules. FAI Category 1 paragliding events publish a list of accepted helmet standards. Always check the latest source.
The best certification is ineffective with a poor fit
Measure your head to establish a starting size, then try the exact model. Head shape varies, and two helmets with the same circumference range may fit very differently.
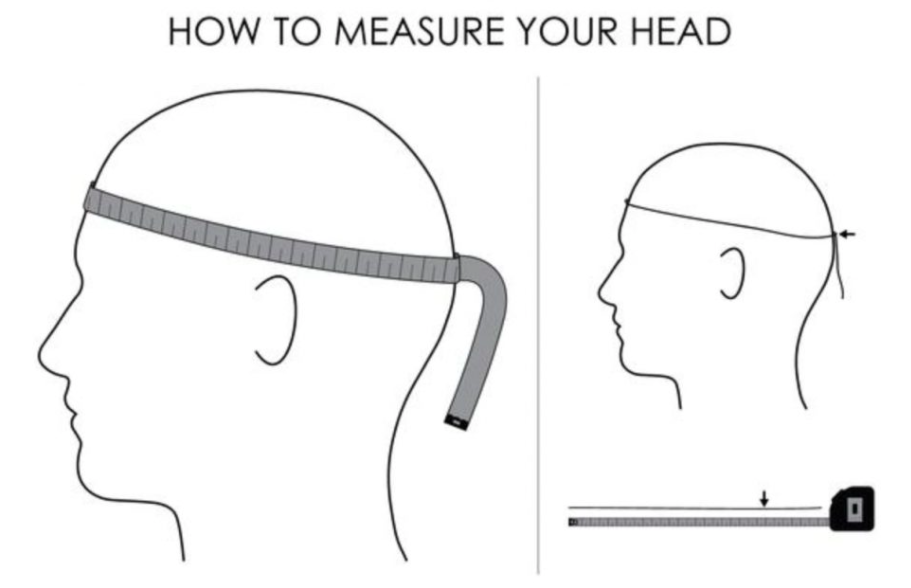
Measure first
Place a soft tape around the widest part of the head, generally just above the eyebrows and ears. Keep the tape level and comfortably snug.
Use this number only to select models to try.
The helmet should feel snug without isolated pressure points. Pain at the forehead, temples or back of the skull usually indicates the wrong shape or size.
With the chin strap fastened, move the helmet front to back and side to side. The skin should move with the padding rather than the shell sliding independently.
The strap and buckle must keep the helmet on during a multi-directional impact. Check adjustment, comfort and whether the buckle can be operated with gloves.
The helmet should sit level rather than tipped back. It should protect the forehead without obstructing vision or contacting the nose when moved.
Look fully left, right, up and down. Check peripheral vision, risers, radio, environmental sound and whether ear covers alter awareness.
Wear the helmet for at least fifteen to twenty minutes. Heat and pressure problems often appear after the first comfortable moments.
Use only the manufacturer’s approved liner, pads and adjustment system. An incorrect modification can alter retention, impact clearance and certified performance.
Coverage versus openness
Neither style is automatically correct for every pilot. Compare facial coverage, visibility, hearing, airflow, weight, packability and communication requirements.
 Open-face
Maximum openness and awareness
Open-face helmets leave the face and jaw unobstructed. They are widely used for free-flight, training, tandem passengers and recreational flying.
 Full-face
Additional facial coverage
Full-face helmets add a chin section and may include a visor. They can provide additional coverage against facial contact while remaining designed for free-flight.

Compare exact models
A comfortable, secure open-face helmet can be a better choice than a poorly fitted full-face model. Never trade fit, visibility or retention merely to gain a particular style.
Interactive starting-point selector
Select the needs that genuinely apply. The result suggests a category to try, not a model or an approval to purchase without fitting it.
Features that influence real use
The strap should be comfortable, correctly positioned and easy to check. The buckle must remain secure while being operable with gloves.
Compare actual size-specific weight. A lighter helmet may reduce fatigue, but fit, coverage and certification take priority.
Ventilation affects comfort and visor fogging. Check whether vents can be closed and whether padding blocks airflow.
Ear covers, headsets and wind noise alter what the pilot hears. Test radio audio, nearby pilots and normal environmental cues.
The shell, visor and chin section must not obstruct risers, traffic, terrain or the pilot’s ability to look fully around.
Check for distortion, reflections, scratches and misting. Tinted visors can become unsuitable in low light, cloud shadow or late evening.
Wear the exact glasses during fitting. The arms should not create pressure points or become trapped during removal.
Washable liners improve hygiene. Check whether replacement pads are available and approved by the manufacturer.
A visible colour may help others locate the pilot on the ground or in the air. Colour should remain secondary to fit and certification.
Cameras, lights and communication systems may create snag points or alter performance. Use only arrangements permitted by the manufacturer.
Check whether the helmet fits the rucksack without crushing the liner or placing heavy equipment inside the shell.
Replacement visors, liners, buckles and clear instructions add long-term value. Avoid helmets with uncertain origin or no manufacturer support.
Integrated eye protection
A visor can reduce wind, insects, dust and cold exposure, but it also adds an optical surface that can scratch, fog, reflect and change visibility.
A dark visor that is comfortable in strong sun can become restrictive late in the day, in shadow or under cloud. Do not fly with compromised vision.

Radio and paramotor use
Paramotor pilots and some tandem or instructional operations may need integrated ear defenders, speakers, microphones and radio connections.
Use a helmet and communications installation intended for the application. Drilling the shell, cutting the impact liner or forcing unapproved speakers into the padding can weaken the helmet or create harmful pressure points.
Buy for the activity, noise environment and communication system that will actually be used.
Interactive fitting prompt
Work through every point while wearing the helmet as it will be flown, including glasses, balaclava, headset or visor where relevant.
Protect the protection
Helmet materials can be damaged by impact, heat, chemicals, UV exposure, poor storage and unauthorised modification.
Adhesives, solvents, paints, screws and camera mounts may damage materials or create snag and point-loading hazards. Follow the manufacturer’s instructions for accessories.
Buying second-hand
A second-hand helmet may have experienced an impact, heat, chemical exposure, compression or ageing without obvious external damage.
Because the helmet protects through controlled deformation of its materials, hidden damage matters. Buying new is normally the clearest choice when the history cannot be verified.

A conservative buying rule
A helmet is relatively inexpensive compared with the rest of a paragliding setup. Do not accept uncertain protection to save a modest amount of money.
Avoid the familiar errors
Circumference narrows the size range, but head shape and model geometry decide whether the fit is actually correct.
Padding can settle with use. A new helmet that already moves significantly is unlikely to improve.
Check the exact certification and intended use rather than relying on a generic marking or retailer description.
Rigid mounts and protrusions may create snag points or concentrate impact force. Follow the helmet manufacturer’s guidance.
Light can change during a long flight. Maintain clear vision in shadow, cloud, haze and late-day conditions.
Protective material can be damaged without an obvious crack. Follow the manufacturer’s replacement instruction.
Helmet questions
Yes. Ground handling can expose the pilot to dragging, trips and sudden impacts. Put the helmet on and fasten it before inflating the wing.
EN 966 is the European standard specifically for airborne-sports helmets and is the clearest purpose-specific choice. Other standards may be accepted under particular organisation or event rules, so check the current requirements.
A full-face design provides additional jaw and facial coverage, but overall protection also depends on certification, fit, retention and whether the helmet remains correctly positioned. A poorly fitting full-face helmet is not a sound choice.
It should be snug and make even contact without painful pressure points. With the strap fastened, the shell should not slide significantly while the head remains still.
Some organisations and FAI competition rules accept specified snow-sports standards, but not every ski helmet or class is automatically suitable. Check the exact marking, current rules, fit and intended use.
Follow the manufacturer’s advice. A significant impact onto a hard surface can damage the shell or liner even when damage is not obvious. When uncertain, remove it from service and seek manufacturer guidance.
Use the interval specified by the manufacturer and replace earlier after a significant impact, visible damage, degraded straps or liner, poor fit or heavy use.
Only when the helmet manufacturer permits the mounting method. Drilling, rigid protrusions, strong adhesives and poorly positioned mounts can introduce new hazards.
No. A dark visor may become restrictive in low light, shadow or late evening. Select the tint for expected conditions and retain a clear alternative where practical.
A properly certified adjustable helmet can cover a stated size range, but every passenger still requires an individual fit and retention check. One helmet cannot safely fit every possible head size or shape.
Continue building the equipment system
Comparing helmets?
Include your head circumference, flying activity, preference for open or full face, glasses, visor and communications requirements. We can help narrow the models worth trying.


